
A focused guide for configuring your email account using POP (Post Office Protocol) in Microsoft Outlook 2016 or Microsoft 365.
Before You Start
This tutorial assumes you have already created your email account in your hosting control panel and have your full email address and password ready.
Note: POP is ideal if you primarily use one device to manage your email and prefer to store messages locally. Unlike IMAP, POP downloads emails to your computer and, by default, removes them from the server.
Step-by-Step POP Setup in Outlook
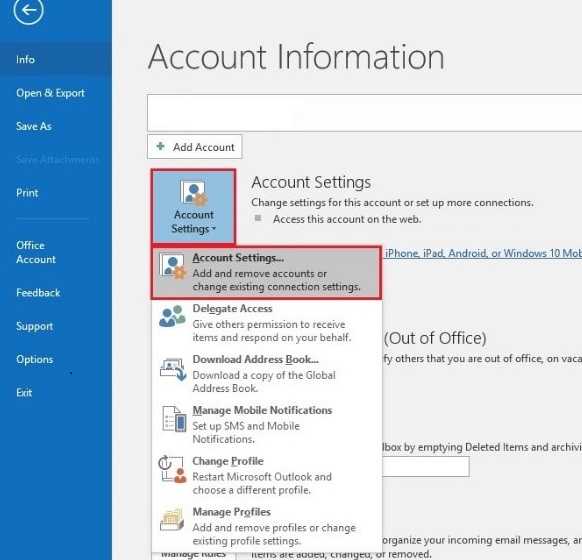
1. Launch Outlook and Access Account Settings
- 1. Open Microsoft Outlook on your computer.
- 2. Click File in the top-left corner.
- 3. From the dropdown, select Account Settings > Account Settings again.
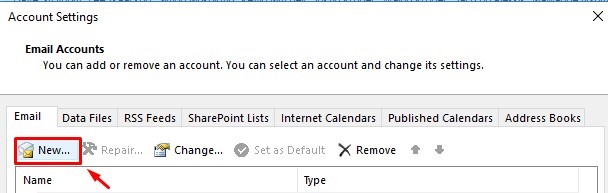
- 4. In the Account Settings window, click New to add a new email account.
2. Choose Manual Setup & Select POP
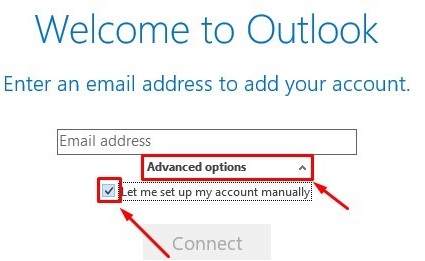
- 5. Click Advanced Options and check the box labeled “Let me set up my account manually”.
- 6. Select POP as your account type. (IMAP is not used in this guide and should not be used for your Desktop / Laptop.)
3. Enter Your Account Details
- 7. Fill in the following details:
- Your Name: As you want it to appear on outgoing messages.
- Email Address: Your full email address.
- Password: Your email account password.
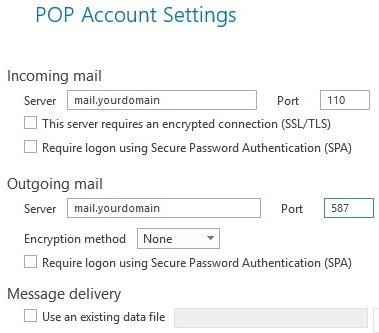
- 8. Enter the POP server settings. Refer to the POP Settings table below for the correct ports and server names.
4. Configure Server & Port Settings
- 9. In the Incoming mail (POP3) field, enter your mail server (e.g.,
mail.yourdomain.com). - 10. Set the Outgoing mail (SMTP) server – this is usually the same server name.
- 11. Under Ports, ensure the following:
- POP3 port:
110(non-encrypted) or995(SSL/TLS). - SMTP port:
587(with TLS) – this is the recommended port for sending.
- POP3 port:
5. Complete the Setup
- 12. Click Next. Outlook will test the connection.
- 13. If prompted, re-enter your password and click OK.
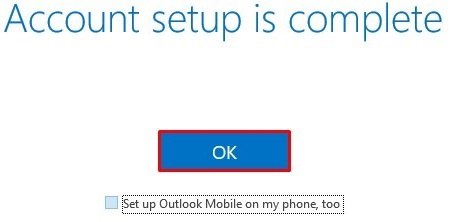
- 14. Once the test is successful, you’ll see a confirmation. Click Finish.
POP Server Settings
Use these settings when configuring your POP account in Outlook 2016 or Microsoft 365.
Incoming Mail Server (POP3): mail.yourdomain.com
POP3 Port (non-encrypted): 110
POP3 Port (SSL/TLS): 995 (recommended for security)
Outgoing Mail Server (SMTP): mail.yourdomain.com
SMTP Port (TLS): 587 (recommended)
SMTP Port (SSL): 465 (alternative)
Authentication: Password (required for both POP and SMTP)
Replace mail.yourdomain.com with your actual domain name or the mail server provided by your hosting company. If you're unsure, check your hosting control panel or contact your email provider.
Additional Information
POP downloads emails to your local device and, by default, deletes them from the server after download. This is ideal if:
- You only check email from one computer.
- You want to save storage space on your hosting account.
- You prefer offline access to all your messages.
If you access email from multiple devices (phone, tablet, webmail), consider using IMAP instead.
For better security, always use SSL/TLS ports (995 for POP, 587 with TLS for SMTP). In Outlook, you can enable these under More Settings > Advanced after entering your account details.
Troubleshooting Tips
- Double-check server names and ports: A simple typo can prevent connection. Verify with your hosting provider.
- Confirm your password: Ensure Caps Lock is off and you're using the correct email password.
- Check internet connectivity: Outlook requires an active connection to send/receive.
- Try removing and re-adding the account: If the setup fails, delete the account and start over.
- Firewall or antivirus: Temporarily disable them to see if they are blocking Outlook.
- Contact support: If issues persist, reach out to your email hosting provider for accurate server details.
Need more help? Refer to Microsoft’s official Outlook documentation or contact your email provider’s support team if it is an account we do not provision.
Please note if you need paid support to set up your email, we are happy to assist at our hourly rate.